Hey Lovies,
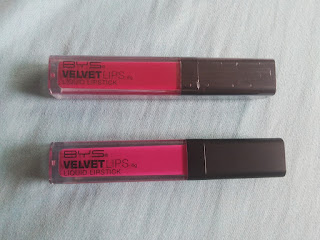
Stoked to be back for a review on a BYS product that I recently bought! In case you're not familiar with the brand BYS, it's a rapidly growing cosmetic brand designed and developed in Melbourne, Australia and is continuously branching out to countries all over the world. So to speak, Philippines is very lucky to have BYS open up a branch here (Yaaaaaay!).
I first came across this BYS liquid lipstick when I was strolling along SM Seaside and went inside their Watsons store. I wasn't really looking around to buy anything but this wonderful lady from the BYS stall was nice enough to approach me and asked me what I needed. And my oh my! My beauty junkie self started to kick in, her lipstick color was on point! and of course, I had to satisfy my want and get one for myself!
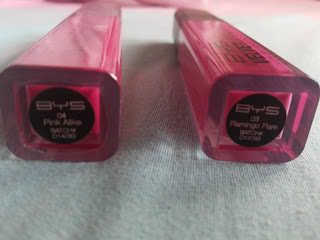
I found out that there were 6 colors available for the BYS velvet lips liquid lipstick. I'm a self-confessed make up hoarder so I wanted to buy all 6! (Un)Fortunately, Only 2 colors were available, so I bought both (Thanks make up gods, for helping me save my money).
Each is for Php 399.00. You can find them in your local department store. I found mine at Watson's.
- 03 Flamingo Flare
- 04 Pink Alike
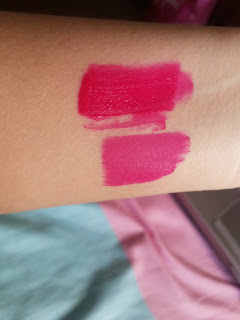 |
| SWATCHES |
Top most swatch is the 04 Pink Alike, What I like most about it is the combination of red and pink hues. Below is swatch 03 Flamingo flare, To be honest I'm not a fan of the color, as I think it doesn't go well with my skin tone.
This is how pink alike looks on my lips, I love this color. This kind of color goes really well with a neutral to light shade of eyeshadow pair them with falsies, and you're good to go.
The flamingo flare looks more pinkish purple. Now i wouldn't really use this for an everyday look. But if you feel like going for a bold and feisty look, try this on. This would look great on fair-skinned Makeup enthusiast!
The Pros:
- Dries really fast
- Has a variety of colors that can work well with different skin tones (I'm making part 2 when I have the other colors)
- Color stays in for a long time
- tends to get really pigmented when it dries
The Cons:
- For a girl on a budget like me, it's a little bit pricey. Other than that, I love these lippies! I'd definitely recommend this to all beauty junkies out there!
So, what do you guys think? Hit me up on instagram and let's talk!
All my love,
